Consul

Consul is a solution that enables teams to securely manage network connections for services across on-premise and multi-cloud environments. It provides service discovery, service mesh, traffic governance, automatic network infrastructure updates, and a series of other features.
Official Documentation: Consul by HashiCorp
Open Source Repository: hashicorp/consul
Consul is a service discovery and registration tool open-sourced by HashiCorp. It uses the Raft election algorithm and is developed in Go, making deployment very lightweight. Consul has the following features:
- Service Discovery
- Service Registration
- Health Checks
- Key-Value Storage
- Multi-Datacenter Support
In fact, Consul can do more than just service discovery; it can also be used as a distributed configuration center. There are many similar open-source tools, such as ZooKeeper and Nacos, which will not be discussed in detail here.
Installation
For Ubuntu, execute the following commands to install using apt:
$ wget -O- https://apt.releases.hashicorp.com/gpg | sudo gpg --dearmor -o /usr/share/keyrings/hashicorp-archive-keyring.gpg
$ echo "deb [signed-by=/usr/share/keyrings/hashicorp-archive-keyring.gpg] https://apt.releases.hashicorp.com $(lsb_release -cs) main" | sudo tee /etc/apt/sources.list.d/hashicorp.list
$ sudo apt update && sudo apt install consul
Alternatively, you can download the corresponding installation package from the official website Install Consul. Since Consul is developed in Go, the installation package itself is just a single binary executable, making installation quite convenient. After successful installation, execute the following command to check the version:
$ consul versionNormal output indicates no issues:
Consul v1.16.1
Revision e0ab4d29
Build Date 2023-08-05T21:56:29Z
Protocol 2 spoken by default, understands 2 to 3 (agent will automatically use protocol >2 when speaking to compatible agents)
Quick Start
The following describes how to quickly set up a single-node Consul cluster. Generally, a single node is used for testing during development. If a single node works without issues, multi-node clusters will likely work as well. Setting up a single node is very simple and requires only one command:
$ consul agent -dev -bind=192.168.48.141 -data-dir=/tmp/consul -ui -node=dev01Typical output is as follows:
==> Starting Consul agent...
               Version: '1.16.1'
            Build Date: '2023-08-05 21:56:29 +0000 UTC'
               Node ID: 'be6f6b8d-9668-f7ff-8709-ed57c72ffdec'
             Node name: 'dev01'
            Datacenter: 'dc1' (Segment: '<all>')
                Server: true (Bootstrap: false)
           Client Addr: [127.0.0.1] (HTTP: 8500, HTTPS: -1, gRPC: 8502, gRPC-TLS: 8503, DNS: 8600)
          Cluster Addr: 192.168.48.141 (LAN: 8301, WAN: 8302)
     Gossip Encryption: false
      Auto-Encrypt-TLS: false
           ACL Enabled: false
     Reporting Enabled: false
    ACL Default Policy: allow
             HTTPS TLS: Verify Incoming: false, Verify Outgoing: false, Min Version: TLSv1_2
              gRPC TLS: Verify Incoming: false, Min Version: TLSv1_2
      Internal RPC TLS: Verify Incoming: false, Verify Outgoing: false (Verify Hostname: false), Min Version: TLSv1_2
==> Log data will now stream in as it occurs:
2023-08-25T17:23:33.763+0800 [DEBUG] agent.grpc.balancer: switching server: target=consul://dc1.be6f6b8d-9668-f7ff-8709-ed57c72ffdec/server.dc1 from=<none> to=<none>
2023-08-25T17:23:33.767+0800 [INFO]  agent.server.raft: initial configuration: index=1 servers="[{Suffrage:Voter ID:be6f6b8d-9668-f7ff-8709-ed57c72ffdec Address:192.168.48.141:8300}]"
Brief explanation of parameters:
agentis a subcommand and the core command of Consul.consul agentruns a new Consul agent, where each node is an agent.devis the agent's running mode. There are three modes:dev,client, andserver.bindis the LAN communication address, with port defaulting to 8301. This value is typically the server's internal IP address.advertiseis the WAN communication address, with port defaulting to 8302. This value is typically the server's external IP address.data-diris the data storage directory.config-diris the configuration storage directory. Consul reads all JSON files in this directory.bootstrapmarks that the current server enters bootstrap mode and votes for itself during Raft elections. There can be only one server in this mode in the cluster.bootstrap-expectis the expected number of servers in the cluster. Until the specified number is reached, the cluster will not start elections. Cannot be used simultaneously withbootstrap.retry-joinspecifies that the agent will continuously attempt to join specified nodes after startup. It also supports the following service discovery methods:aliyun aws azure digitalocean gce hcp k8s linode mdns os packet scaleway softlayer tencentcloud triton vsphereuiruns the web interface.nodeis the execution node name, which must be unique in the cluster.
TIP
For more agent parameter explanations, visit Agents - CLI Reference | Consul | HashiCorp Developer. Note that some parameters are only available in the enterprise version.
After successfully running, visit 127.0.0.1:8500 to browse the web interface.
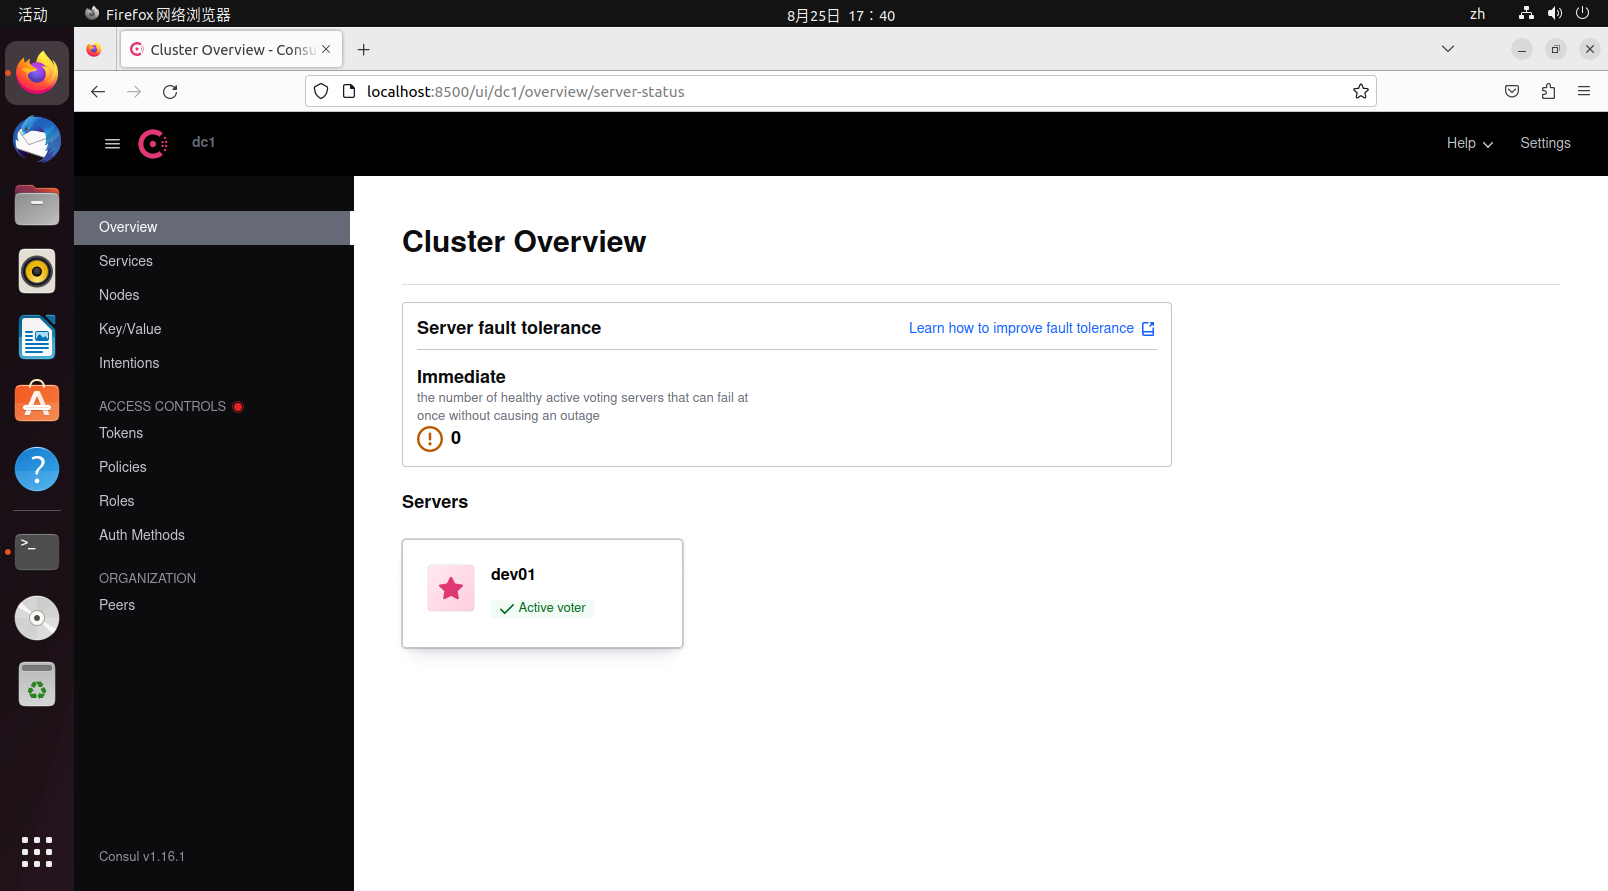
The dev01 icon is a star, indicating it is the leader node.
When exiting, to allow other nodes to perceive the current node's exit, it is not recommended to forcibly kill the process. Instead, use the command:
consul leaveOr:
consul force-leaveYou can also press ctrl+c to let the Consul agent exit gracefully.
Concepts

This is a diagram of a Consul cluster, divided into two parts: the control plane and the data plane. Consul is only responsible for the control plane, which consists of the service cluster and clients. The service cluster is further divided into followers and leaders. Overall, the Consul cluster in the diagram constitutes a data center. Below is an explanation of some terminology:
Agent (Proxy): Or more appropriately called a node. Each agent is a long-running daemon process that exposes HTTP and DNS interfaces, responsible for health checks and service synchronization.
Server (Service Proxy): As a Consul server, its responsibilities include participating in Raft elections, maintaining cluster state, responding to queries, exchanging data with other data centers, and forwarding queries to leaders and other data centers.
Client (Client Proxy): Clients are stateless compared to servers. They do not participate in Raft elections and only forward all requests to servers. The only background-related task they participate in is LAN gossip pooling.
Leader: The leader is the head of all servers, and there can only be one leader. Leaders are elected through the Raft election algorithm. Each leader has its own term, and during the term, any requests received by other servers must be forwarded to the leader, so the leader's data is the most up-to-date.
Gossip: Consul is built on Serf (another product from the company) and uses the gossip protocol, which is designed for random communication between nodes, similar to UDP. Consul uses this protocol for mutual notifications within the service cluster.
Data Center: A Consul cluster within a LAN is called a data center. Consul supports multiple data centers, and the communication method between multiple data centers is WAN gossip.
TIP
For more vocabulary and terminology, visit Glossary | Consul | HashiCorp Developer.
In a Consul cluster, the number of servers should be strictly controlled because they directly participate in LAN gossip and WAN gossip, Raft elections, and store data. More servers mean higher communication costs. The number of clients can be larger without issues since they only forward requests and do not participate in elections, consuming very few resources. In the cluster shown in the diagram, various services register themselves with servers through clients. If a server goes down, clients will automatically find other available servers.
Cluster Setup Example
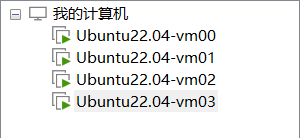
The following demonstrates a simple multi-node Consul cluster setup. First, prepare four virtual machines:
Among the four virtual machines, three are servers and one is a client. The official recommendation is that the number of servers should be odd and preferably at least three. Here, vm00-vm02 serve as servers, and vm03 serves as a client.
For servers, run the following command to create a server agent:
consul agent -server -bind=vm_address -client=0.0.0.0 -data-dir=/tmp/consul/ -node=agent_name -uiFor clients, run the following command to create a client agent:
consul agent -client=0.0.0.0 -bind=vm_address -data-dir=/tmp/consul/ -node=agent_name -uiThe executed commands are as follows:
# vm00
consul agent -server -bind=192.168.48.138 -client=0.0.0.0 -data-dir=/tmp/consul/ -node=agent01 -ui -bootstrap

# vm01
consul agent -server -bind=192.168.48.139 -client=0.0.0.0 -data-dir=/tmp/consul/ -node=agent02 -ui -retry-join=192.168.48.138

# vm02
consul agent -server -bind=192.168.48.140 -client=0.0.0.0 -data-dir=/tmp/consul/ -node=agent03 -ui -retry-join=192.168.48.138

# vm03
consul agent -bind=192.168.48.140 -client=0.0.0.0 -data-dir=/tmp/consul/ -node=agent03 -ui -retry-join=192.168.48.138
Parameter explanations:
client:0.0.0.0allows requests from all sources. If only theclientparameter is present without theserverparameter, the agent will run in client mode.
After all agents are running, the retry-join parameter acts like automatically executing the join command, continuously retrying on failure. The default retry interval is 30 seconds:
$ consul join 192.168.48.138After the join completes, all nodes are aware of each other's existence. Since vm00 specified bootstrap mode, it becomes the default leader. If bootstrap mode is not specified, the node specified during join becomes the default leader. Before the leader is elected, the cluster cannot function properly; accessing the web interface will return 500, and some commands will not work correctly. If a node in the cluster specifies bootstrap mode, no other nodes in the cluster should specify bootstrap mode, and other nodes should not use the bootstrap-expect parameter. If used, it will be automatically disabled.
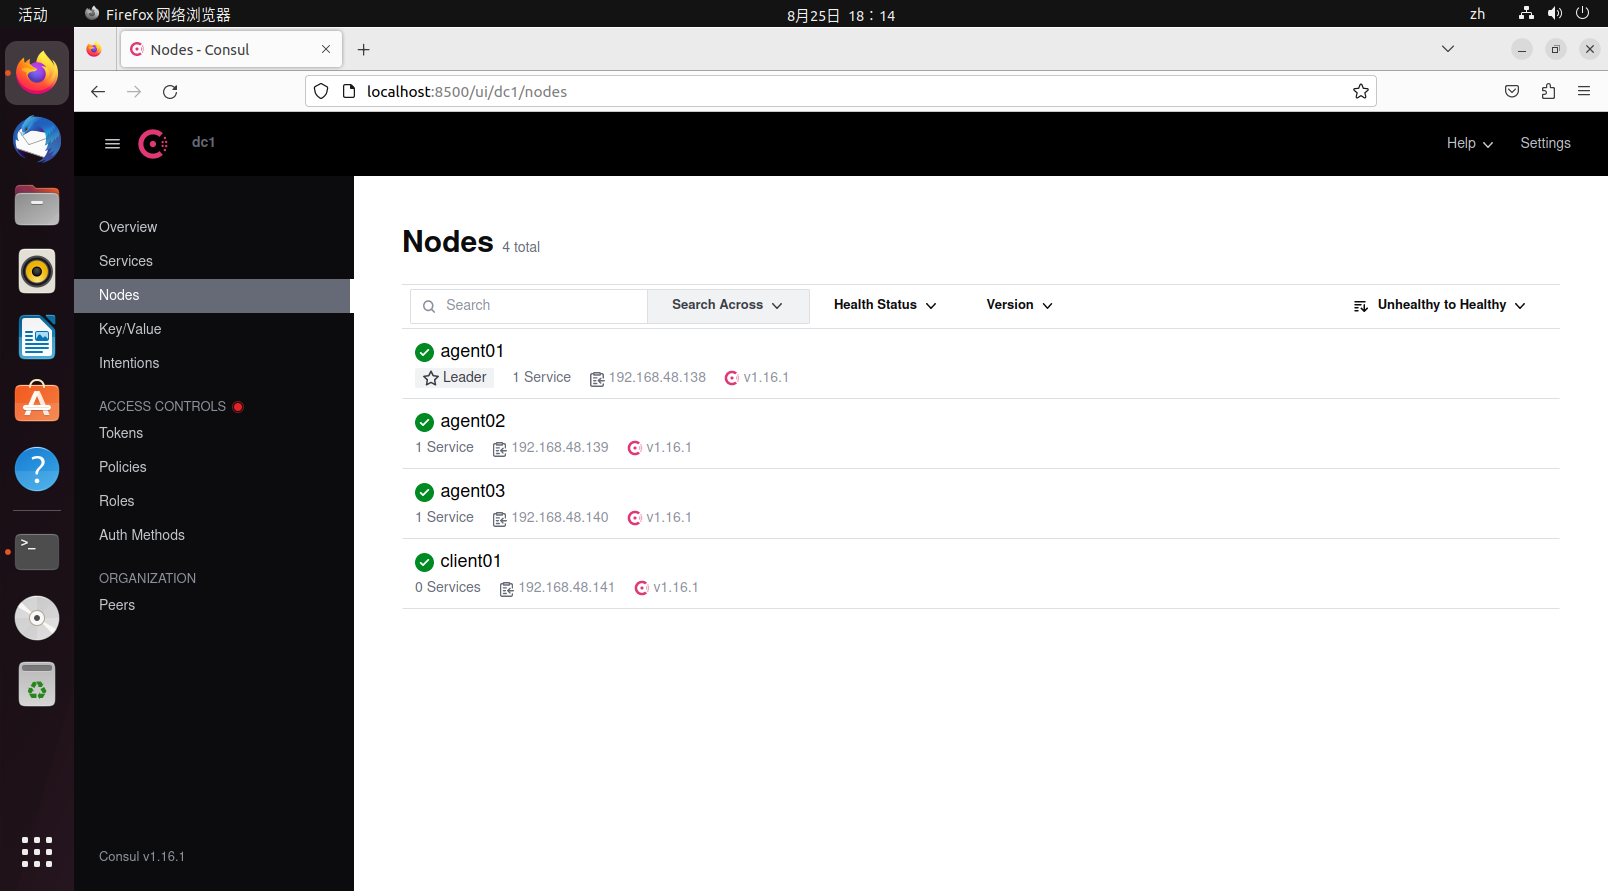
At this point, run the following command on the leader node (actually, you can check from any node at this point) to view data center member information:
$ consul members
Node      Address              Status  Type    Build   Protocol  DC   Partition  Segment
agent01   192.168.48.138:8301  alive   server  1.16.1  2         dc1  default    <all>
agent02   192.168.48.139:8301  alive   server  1.16.1  2         dc1  default    <all>
agent03   192.168.48.140:8301  alive   server  1.16.1  2         dc1  default    <all>
client01 192.168.48.141:8301 alive client 1.16.1 2 dc1 default <default>- Node: Node name
- Address: Communication address
- Status:
aliveindicates online,leftindicates offline - Type: Agent type, server and client modes
- Build: Consul version used by the node. Consul can work with nodes of different versions within a certain range.
- Protocol: Refers to the Raft protocol version used. This protocol should be consistent across all nodes.
- DC: Data Center. All nodes in the output belong to the dc1 data center.
- Partition: The partition the node belongs to, an enterprise feature. Each node can only communicate with nodes in the same partition.
- Segment: The network segment the node belongs to, an enterprise feature.
Similarly, if you want a node to exit, you should use consul leave to let the node exit gracefully and notify other nodes of its impending exit. For multi-node scenarios, graceful node exit is particularly important as it relates to data consistency.
TIP
In the demonstration, all firewalls were turned off on the virtual machines. In actual production environments, firewalls should be enabled for security considerations. Therefore, you should pay attention to all ports used by Consul: Required Ports | Consul | HashiCorp Developer.
Next, let's briefly test data consistency. Add the following data on the vm00 virtual machine:
$ consul kv put sys_confg {"name":"consul"}
Success! Data written to: sys_confg
After saving, access other nodes through the HTTP API to find that the data also exists (the value is base64 encoded):
$ curl http://192.168.48.138:8500/v1/kv/sys_confg
[{"LockIndex":0,"Key":"sys_confg","Flags":0,"Value":"ewogICJuYW1lIjoiY29uc3VsIgp9","CreateIndex":2518,"ModifyIndex":2518}]
$ curl http://192.168.48.139:8500/v1/kv/sys_confg
[{"LockIndex":0,"Key":"sys_confg","Flags":0,"Value":"ewogICJuYW1lIjoiY29uc3VsIgp9","CreateIndex":2518,"ModifyIndex":2518}]
$ curl http://192.168.48.140:8500/v1/kv/sys_confg
[{"LockIndex":0,"Key":"sys_confg","Flags":0,"Value":"ewogICJuYW1lIjoiY29uc3VsIgp9","CreateIndex":2518,"ModifyIndex":2518}]
In fact, Consul's service discovery and registration features are broadcast to other nodes through the gossip protocol. When any node joins the current data center, all nodes will perceive this change.
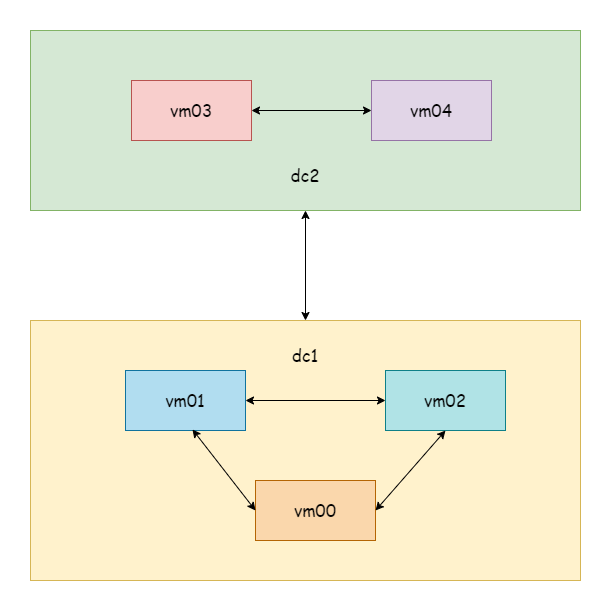
Multi-Datacenter Setup Example
Prepare five virtual machines. vm00-vm02 are the cluster from the previous example, belonging to the dc1 data center, and we won't touch them. vm03-vm04 belong to the dc2 data center. The data center defaults to dc1 when the agent starts.
TIP
For demonstration purposes, only servers are set up here, omitting clients.
First, start vm03 as the default leader:
$ consul agent -server -datacenter=dc2 -bind=192.168.48.141 -client=0.0.0.0 -data-dir=/tmp/consul/ -node=agent04 -ui -bootstrapStart vm04 and let it automatically join the vm03 node:
$ consul agent -server -datacenter=dc2 -bind=192.168.48.142 -client=0.0.0.0 -data-dir=/tmp/consul/ -node=agent05 -ui -retry-join=192.168.48.141At this point, check members on vm00 and vm03 respectively:
# vm00-vm02
$ consul members
Node      Address              Status  Type    Build   Protocol  DC   Partition  Segment
agent01   192.168.48.138:8301  alive   server  1.16.1  2         dc1  default    <all>
agent02   192.168.48.139:8301  alive   server  1.16.1  2         dc1  default    <all>
agent03   192.168.48.140:8301  alive   server  1.16.1  2         dc1  default    <all>

# vm03-vm04
$ consul members
Node     Address              Status  Type    Build   Protocol  DC   Partition  Segment
agent04  192.168.48.141:8301  alive   server  1.16.1  2         dc2  default    <all>
agent05  192.168.48.142:8301  alive   server  1.16.1  2         dc2  default    <all>
You can see the DC field is different. Since this is a virtual machine demonstration, they are all in the same network segment. In reality, two data centers might be server clusters in different locations. Next, let any node in dc1 join any node in dc2. Here, let vm01 join vm03:
$ consul join -wan 192.168.48.141
Successfully joined cluster by contacting 1 nodes.
After a successful join, execute the command to view WAN members:
$ consul members -wan
Node         Address              Status  Type    Build   Protocol  DC   Partition  Segment
agent01.dc1  192.168.48.138:8302  alive   server  1.16.1  2         dc1  default    <all>
agent02.dc1  192.168.48.139:8302  alive   server  1.16.1  2         dc1  default    <all>
agent03.dc1  192.168.48.140:8302  alive   server  1.16.1  2         dc1  default    <all>
agent04.dc2  192.168.48.141:8302  alive   server  1.16.1  2         dc2  default    <all>
agent05.dc2  192.168.48.142:8302  alive   server  1.16.1  2         dc2  default    <all>

$ consul catalog datacenters
dc2
dc1
As long as any node in dc1 joins any node in dc2, all nodes in both data centers will perceive this change. When viewing members, you can also see nodes from both data centers.
Next, try adding a KV data entry on the vm00 node:
$ consul kv put name consul
Success! Data written to: name
Try reading the data on the vm01 node. You can see that data within the same data center is synchronized:
$ consul kv get name
consul
Then try reading the data on vm03 in a different data center. You will find that data across different data centers is not synchronized:
$ consul kv get name
Error! No key exists at: name
If you want multi-datacenter data synchronization, you can learn about hashicorp/consul-replicate: Consul cross-DC KV replication daemon.
Service Registration and Discovery
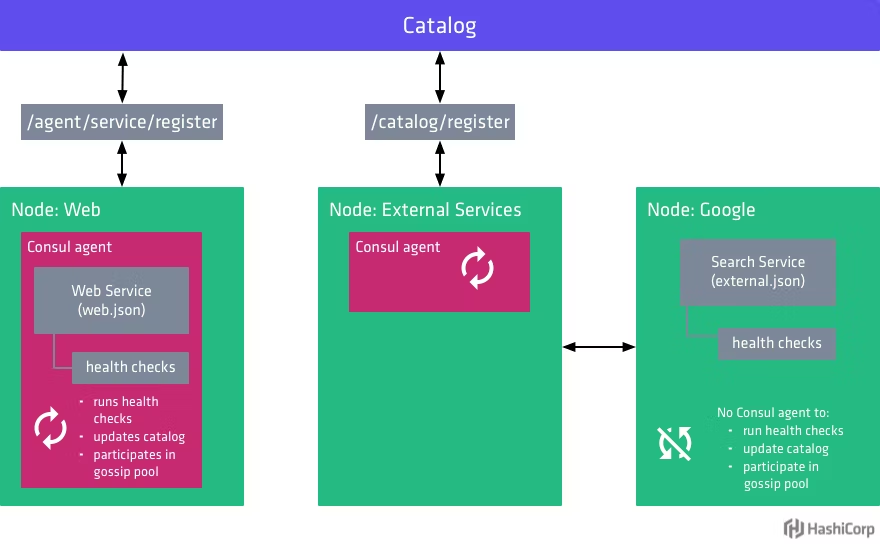
There are two ways to register services in Consul: configuration file registration and API registration. For convenience in testing, a Hello World service (an example from the gRPC article) is prepared here and deployed in two different locations. For configuration file registration, visit Register external services with Consul service discovery | Consul | HashiCorp Developer. This article only introduces registration through the HTTP API.
TIP
For local services (together with Consul client), you can directly use agent service registration. Otherwise, you should use catalog register for registration.
Consul provides SDKs for HTTP APIs. For SDKs in other languages, visit Libraries and SDKs - HTTP API | Consul | HashiCorp Developer. Here, download the Go dependency:
go get github.com/hashicorp/consul/apiActively register the service with Consul when the service starts, and deregister the service from Consul when the service shuts down. Below is an example:
package main

import (
  consulapi "github.com/hashicorp/consul/api"
  "google.golang.org/grpc"
  "google.golang.org/grpc/credentials/insecure"
  pb "grpc_learn/helloworld/hello"
  "log"
  "net"
)

var (
  server01 = &consulapi.AgentService{
        // Must be unique
    ID:      "hello-service1",
    Service: "hello-service",
        // Deployed in two instances, one on port 8080, one on port 8081
    Port:    8080,
  }
)

// Register service
func Register() {
  client, _ := consulapi.NewClient(&consulapi.Config{Address: "192.168.48.138:8500"})
  _, _ = client.Catalog().Register(&consulapi.CatalogRegistration{
    Node:    "hello-server",
    Address: "192.168.2.10",
    Service: server01,
  }, nil)
}

// Deregister service
func DeRegister() {
  client, _ := consulapi.NewClient(&consulapi.Config{Address: "192.168.48.138:8500"})
  _, _ = client.Catalog().Deregister(&consulapi.CatalogDeregistration{
    Node:      "hello-server",
    Address:   "192.168.2.10",
    ServiceID: server01.ID,
  }, nil)
}

func main() {
  Register()
  defer DeRegister()

  // Listen on port
  listen, err := net.Listen("tcp", ":8080")
  if err != nil {
    panic(err)
  }
  // Create gRPC server
  server := grpc.NewServer(
    grpc.Creds(insecure.NewCredentials()),
  )
  // Register service
  pb.RegisterSayHelloServer(server, &HelloRpc{})
  log.Println("server running...")
  // Run
  err = server.Serve(listen)
  if err != nil {
    panic(err)
  }
}
The client code uses a Consul custom resolver to query the registry for corresponding services and resolve them to real addresses:
package myresolver

import (
    "fmt"
    consulapi "github.com/hashicorp/consul/api"
    "google.golang.org/grpc/resolver"
)

func NewConsulResolverBuilder(address string) ConsulResolverBuilder {
    return ConsulResolverBuilder{consulAddress: address}
}

type ConsulResolverBuilder struct {
    consulAddress string
}

func (c ConsulResolverBuilder) Build(target resolver.Target, cc resolver.ClientConn, opts resolver.BuildOptions) (resolver.Resolver, error) {
    consulResolver, err := newConsulResolver(c.consulAddress, target, cc)
    if err != nil {
       return nil, err
    }
    consulResolver.resolve()
    return consulResolver, nil
}

func (c ConsulResolverBuilder) Scheme() string {
    return "consul"
}

func newConsulResolver(address string, target resolver.Target, cc resolver.ClientConn) (ConsulResolver, error) {
    var reso ConsulResolver
    client, err := consulapi.NewClient(&consulapi.Config{Address: address})
    if err != nil {
       return reso, err
    }
    return ConsulResolver{
       target: target,
       cc:     cc,
       client: client,
    }, nil
}

type ConsulResolver struct {
    target resolver.Target
    cc     resolver.ClientConn
    client *consulapi.Client
}

func (c ConsulResolver) resolve() {
    service := c.target.URL.Opaque
    services, _, err := c.client.Catalog().Service(service, "", nil)
    if err != nil {
       c.cc.ReportError(err)
       return
    }
    var adds []resolver.Address
    for _, catalogService := range services {
       adds = append(adds, resolver.Address{Addr: fmt.Sprintf(fmt.Sprintf("%s:%d", catalogService.Address, catalogService.ServicePort))})
    }

    c.cc.UpdateState(resolver.State{
       Addresses: adds,
       // Round-robin strategy
       ServiceConfig: c.cc.ParseServiceConfig(
          `{"loadBalancingPolicy":"round_robin"}`),
    })
}

func (c ConsulResolver) ResolveNow(options resolver.ResolveNowOptions) {
    c.resolve()
}

func (c ConsulResolver) Close() {

}
Register the resolver when the client starts:
package main

import (
    "context"
    "google.golang.org/grpc"
    "google.golang.org/grpc/credentials/insecure"
    "google.golang.org/grpc/resolver"
    "grpc_learn/helloworld/client/myresolver"
    hello2 "grpc_learn/helloworld/hello"
    "log"
    "time"
)

func init() {
    // Register builder
    resolver.Register(
       // Register custom Consul resolver
       myresolver.NewConsulResolverBuilder("192.168.48.138:8500"),
    )
}

func main() {

    // Establish connection, no encryption verification
    conn, err := grpc.Dial("consul:hello-service",
       grpc.WithTransportCredentials(insecure.NewCredentials()),
    )
    if err != nil {
       panic(err)
    }
    defer conn.Close()
    // Create client
    client := hello2.NewSayHelloClient(conn)
    for range time.Tick(time.Second) {
       // Remote call
       helloRep, err := client.Hello(context.Background(), &hello2.HelloReq{Name: "client"})
       if err != nil {
          panic(err)
       }
       log.Printf("received grpc resp: %+v", helloRep.String())
    }

}
First start the server, then start the client. There are two servers providing the same service but with different addresses. The client's load balancing strategy is round-robin, which can be seen from the server log intervals that the strategy is in effect:
2023/08/29 17:39:54 server running...
2023/08/29 21:03:46 received grpc req: name:"client"
2023/08/29 21:03:48 received grpc req: name:"client"
2023/08/29 21:03:50 received grpc req: name:"client"
2023/08/29 21:03:52 received grpc req: name:"client"
2023/08/29 21:03:54 received grpc req: name:"client"
2023/08/29 21:03:56 received grpc req: name:"client"
2023/08/29 21:03:58 received grpc req: name:"client"
2023/08/29 21:04:00 received grpc req: name:"client"
The above is a simple case of using Consul combined with gRPC to implement service registration and discovery.