Concurrency
Go language has native support for concurrency, which is the core of this language. Its learning curve is relatively small, and developers don't need to pay much attention to the underlying implementation to create a quite good concurrent application, improving the lower limit of developers.
Goroutine
Goroutine (coroutine) is a lightweight thread, or user-space thread, not directly scheduled by the operating system but by Go language's own scheduler for runtime scheduling, so context switching overhead is very small, which is one of the reasons why Go's concurrent performance is quite good. The concept of coroutine was not first proposed by Go, and Go is not the first language to support coroutines, but Go is the first language that can support coroutines and concurrency quite simply and elegantly.
In Go, creating a goroutine is very simple, just need a go keyword to quickly start a goroutine, and the go keyword must be followed by a function call. An example is as follows
TIP
Built-in functions with return values are not allowed to follow the go keyword, for example, the following incorrect demonstration
go make([]int,10) // go discards result of make([]int, 10) (value of type []int)func main() {
go fmt.Println("hello world!")
go hello()
go func() {
fmt.Println("hello world!")
}()
}
func hello() {
fmt.Println("hello world!")
}The above three ways to start a goroutine are all possible, but in fact, this example will most likely output nothing when executed. Goroutines execute concurrently, and the system needs time to create goroutines, but before that, the main goroutine has already finished running. Once the main thread exits, other child goroutines naturally exit as well. And the execution order of goroutines is also uncertain and unpredictable, for example, the following example
func main() {
  fmt.Println("start")
  for i := 0; i < 10; i++ {
    go fmt.Println(i)
  }
  fmt.Println("end")
}
This is an example of starting goroutines in a loop body, and it's impossible to accurately predict what it will output. It's possible that before the child goroutines even start running, the main goroutine has already ended, as follows
start
end
Or only some child goroutines successfully run before the main goroutine exits, as follows
start
0
1
5
3
4
6
7
end
The simplest approach is to let the main goroutine wait for a while, using the Sleep function from the time package, which can pause the current goroutine for a period of time. An example is as follows
func main() {
  fmt.Println("start")
  for i := 0; i < 10; i++ {
    go fmt.Println(i)
  }
    // Pause for 1ms
  time.Sleep(time.Millisecond)
  fmt.Println("end")
}
Executing again, the output is as follows, you can see all numbers are completely output without omission
start
0
1
5
2
3
4
6
8
9
7
end
But the order is still chaotic, so let each loop wait a bit. An example is as follows
func main() {
   fmt.Println("start")
   for i := 0; i < 10; i++ {
      go fmt.Println(i)
      time.Sleep(time.Millisecond)
   }
   time.Sleep(time.Millisecond)
   fmt.Println("end")
}
Now the output is in normal order
start
0
1
2
3
4
5
6
7
8
9
end
In the above example, the result output is perfect, so is the concurrency problem solved? No, not at all. For concurrent programs, there are many uncontrollable factors, execution timing, order, execution process time consumption, etc. If the work of child goroutines in the loop is not just a simple output of numbers, but a very large and complex task with uncertain time consumption, the previous problem will still occur. For example, the following code
func main() {
   fmt.Println("start")
   for i := 0; i < 10; i++ {
      go hello(i)
      time.Sleep(time.Millisecond)
   }
   time.Sleep(time.Millisecond)
   fmt.Println("end")
}

func hello(i int) {
   // Simulate random time consumption
   time.Sleep(time.Millisecond * time.Duration(rand.Intn(1000)))
   fmt.Println(i)
}
The output of this code is still uncertain, below is one possible situation
start
0
3
4
end
Therefore, time.Sleep is not a good solution. Fortunately, Go provides many concurrency control methods. There are three commonly used concurrency control methods:
channel: PipelineWaitGroup: SemaphoreContext: Context
The three methods have different applicable situations. WaitGroup can dynamically control a group of specified number of goroutines, Context is more suitable for situations where descendant goroutines have deeper nesting levels, and pipelines are more suitable for communication between goroutines. For more traditional lock control, Go also provides support:
Mutex: Mutual exclusion lockRWMutex: Read-write mutual exclusion lock
Channel
channel, translated as pipeline, Go explains the purpose of pipeline as follows:
Do not communicate by sharing memory; instead, share memory by communicating.
That is, sharing memory through messages, channel is born for this purpose. It is a solution for communication between goroutines, and can also be used for concurrency control. Let's first understand the basic syntax of channel. In Go, the keyword chan is used to represent the pipeline type, and the storage type of the pipeline must also be declared to specify what type of data it stores. The following example is what an ordinary pipeline looks like.
var ch chan intThis is a pipeline declaration statement. At this point, the pipeline has not been initialized, its value is nil, and it cannot be used directly.
Creation
When creating a pipeline, there is only one way, which is to use the built-in function make. For pipelines, the make function takes two parameters, the first is the type of the pipeline, and the second is an optional parameter for the buffer size of the pipeline. An example is as follows
intCh := make(chan int)
// Pipeline with buffer size 1
strCh := make(chan string, 1)
After using a pipeline, remember to close it using the built-in function close. The function signature is as follows.
func close(c chan<- Type)An example of closing a pipeline is as follows
func main() {
  intCh := make(chan int)
  // do something
  close(intCh)
}
Sometimes using defer to close the pipeline might be better.
Read and Write
For a pipeline, Go uses two vivid operators to represent read and write operations:
ch <-: Indicates writing data to a pipeline
<- ch: Indicates reading data from a pipeline
<- vividly represents the direction of data flow. Let's look at an example of reading and writing to an int type pipeline
func main() {
    // If there is no buffer, it will cause a deadlock
  intCh := make(chan int, 1)
  defer close(intCh)
    // Write data
  intCh <- 114514
    // Read data
  fmt.Println(<-intCh)
}
In the above example, an int type pipeline with a buffer size of 1 is created, data 114514 is written to it, then the data is read and output, and finally the pipeline is closed. For read operations, there is a second return value, a boolean value, used to indicate whether the data was read successfully
ints, ok := <-intChThe data flow in the pipeline is the same as a queue, i.e., first-in-first-out (FIFO). Goroutines' operations on the pipeline are synchronous. At any given moment, only one goroutine can write data to it, and only one goroutine can read data from the pipeline.
Unbuffered
For unbuffered pipelines, because the buffer capacity is 0, no data will be temporarily stored. Because unbuffered pipelines cannot store data, when writing data to the pipeline, another goroutine must immediately read the data, otherwise it will block and wait. The same applies when reading data, which also explains why the following code, which looks normal, causes a deadlock.
func main() {
  // Create unbuffered pipeline
  ch := make(chan int)
  defer close(ch)
  // Write data
  ch <- 123
  // Read data
  n := <-ch
  fmt.Println(n)
}
Unbuffered pipelines should not be used synchronously. Correctly, a new goroutine should be started to send data, as in the following example
func main() {
  // Create unbuffered pipeline
  ch := make(chan int)
  defer close(ch)
  go func() {
    // Write data
    ch <- 123
  }()
  // Read data
  n := <-ch
  fmt.Println(n)
}
Buffered
When a pipeline has a buffer, it's like a blocking queue. Reading from an empty pipeline and writing to a full pipeline will both cause blocking. Unbuffered pipelines must be received immediately when sending data, otherwise they will block forever. For buffered pipelines, this is not necessary. When writing data to a buffered pipeline, the data is first put into the buffer, and only when the buffer capacity is full will it block and wait for a goroutine to read the data from the pipeline. Similarly, when reading from a buffered pipeline, it first reads data from the buffer until the buffer has no data, then it blocks and waits for a goroutine to write data to the pipeline. Therefore, the unbuffered pipeline deadlock example can run smoothly here.
func main() {
   // Create buffered pipeline
   ch := make(chan int, 1)
   defer close(ch)
   // Write data
   ch <- 123
   // Read data
   n := <-ch
   fmt.Println(n)
}
Although it can run smoothly, this synchronous read-write approach is very dangerous. Once the pipeline buffer is empty or full, it will block forever because no other goroutine will write to or read from the pipeline. Let's look at the following example
func main() {
  // Create buffered pipeline
  ch := make(chan int, 5)
  // Create two unbuffered pipelines
  chW := make(chan struct{})
  chR := make(chan struct{})
  defer func() {
    close(ch)
    close(chW)
    close(chR)
  }()
  // Responsible for writing
  go func() {
    for i := 0; i < 10; i++ {
      ch <- i
      fmt.Println("Write", i)
    }
    chW <- struct{}{}
  }()
  // Responsible for reading
  go func() {
    for i := 0; i < 10; i++ {
            // Each read takes 1 millisecond
      time.Sleep(time.Millisecond)
      fmt.Println("Read", <-ch)
    }
    chR <- struct{}{}
  }()
  fmt.Println("Write completed", <-chW)
  fmt.Println("Read completed", <-chR)
}
Here, a total of 3 pipelines are created, one buffered pipeline for inter-goroutine communication, and two unbuffered pipelines for synchronizing the execution order of parent and child goroutines. The goroutine responsible for reading waits 1 millisecond before each read, and the goroutine responsible for writing can write at most 5 data at once because the pipeline buffer has a maximum of 5. Without a goroutine to read, it can only block and wait. So the output of this example is as follows
Write 0
Write 1
Write 2
Write 3
Write 4 // Wrote 5 at once, buffer is full, waiting for other goroutines to read
Read 0
Write 5 // Read one, write one
Read 1
Write 6
Read 2
Write 7
Read 3
Write 8
Write 9
Read 4
Write completed {} // All data sent, write goroutine finished
Read 5
Read 6
Read 7
Read 8
Read 9
Read completed {} // All data read, read goroutine finished
You can see that the write goroutine sent 5 data at the beginning, and after the buffer was full, it started blocking and waiting for the read goroutine to read. Afterwards, whenever the read goroutine reads one data after 1 millisecond and the buffer has space, the write goroutine writes one data until all data is sent and the write goroutine finishes execution. Then when the read goroutine finishes reading all data in the buffer, the read goroutine also finishes execution, and finally the main goroutine exits.
TIP
You can access the number of data in the pipeline buffer through the built-in function len, and the size of the pipeline buffer through cap.
func main() {
   ch := make(chan int, 5)
   ch <- 1
   ch <- 2
   ch <- 3
   fmt.Println(len(ch), cap(ch))
}
Output
3 5Using the blocking conditions of pipelines, you can easily write an example where the main goroutine waits for child goroutines to finish executing
func main() {
   // Create an unbuffered pipeline
   ch := make(chan struct{})
   defer close(ch)
   go func() {
      fmt.Println(2)
      // Write
      ch <- struct{}{}
   }()
   // Block and wait for read
   <-ch
   fmt.Println(1)
}
Output
2
1
Using a buffered pipeline, you can also implement a simple mutex lock. Look at the following example
var count = 0

// Pipeline with buffer size 1
var lock = make(chan struct{}, 1)

func Add() {
    // Lock
  lock <- struct{}{}
  fmt.Println("Current count is", count, "executing addition")
  count += 1
    // Unlock
  <-lock
}

func Sub() {
    // Lock
  lock <- struct{}{}
  fmt.Println("Current count is", count, "executing subtraction")
  count -= 1
    // Unlock
  <-lock
}
Since the pipeline buffer size is 1, at most one data can be stored in the buffer. The Add and Sub functions try to send data to the pipeline before each operation. Since the buffer size is 1, if another goroutine has already written data and the buffer is already full, the current goroutine must block and wait until the buffer has space. In this way, at any given moment, at most one goroutine can modify the variable count, thus implementing a simple mutex lock.
Points to Note
The following is a summary. Improper use of the following situations will cause pipeline blocking:
Reading and writing unbuffered pipelines
When directly performing synchronous read and write operations on an unbuffered pipeline, it will cause that goroutine to block
func main() {
   // Created an unbuffered pipeline
   intCh := make(chan int)
   defer close(intCh)
   // Send data
   intCh <- 1
   // Read data
   ints, ok := <-intCh
   fmt.Println(ints, ok)
}
Reading from an empty buffer pipeline
When reading from a pipeline with an empty buffer, it will cause that goroutine to block
func main() {
   // Created buffered pipeline
   intCh := make(chan int, 1)
   defer close(intCh)
   // Buffer is empty, blocking and waiting for other goroutines to write data
   ints, ok := <-intCh
   fmt.Println(ints, ok)
}
Writing to a full buffer pipeline
When the pipeline buffer is full, writing data to it will cause that goroutine to block
func main() {
  // Created buffered pipeline
  intCh := make(chan int, 1)
  defer close(intCh)

  intCh <- 1
    // Full, blocking and waiting for other goroutines to read data
  intCh <- 1
}
Pipeline is nil
When the pipeline is nil, any read or write will cause the current goroutine to block
func main() {
  var intCh chan int
    // Write
  intCh <- 1
}func main() {
var intCh chan int
// Read
fmt.Println(<-intCh)
}The conditions for pipeline blocking need to be well mastered and familiarized. In most cases, these problems are hidden very subtly and won't be as intuitive as in the examples.
The following situations will also cause panic:
Closing a nil pipeline
When the pipeline is nil, using the close function to close it will cause panic
func main() {
  var intCh chan int
  close(intCh)
}
Writing to a closed pipeline
Writing data to a closed pipeline will cause panic
func main() {
  intCh := make(chan int, 1)
  close(intCh)
  intCh <- 1
}
Closing an already closed pipeline
In some situations, a pipeline may be passed through multiple layers, and the caller may not know who should close the pipeline. As a result, closing an already closed pipeline may occur, which will cause panic.
func main() {
  ch := make(chan int, 1)
  defer close(ch)
  go write(ch)
  fmt.Println(<-ch)
}

func write(ch chan<- int) {
  // Can only send data to the pipeline
  ch <- 1
  close(ch)
}
Unidirectional Pipeline
Bidirectional pipeline refers to a pipeline that can both write and read, i.e., operations can be performed on both sides of the pipeline. Unidirectional pipeline refers to a pipeline that is read-only or write-only, i.e., operations can only be performed on one side of the pipeline. Manually creating a read-only or write-only pipeline doesn't have much meaning because not being able to read or write to the pipeline loses its purpose. Unidirectional pipelines are usually used to restrict the behavior of channels, generally appearing in function parameters and return values. For example, the built-in function close used to close channels uses a unidirectional channel in its function signature.
func close(c chan<- Type)Or the commonly used After function in the time package
func After(d Duration) <-chan TimeThe parameter of the close function is a write-only channel, and the return value of the After function is a read-only channel. So the syntax for unidirectional channels is as follows:
- Arrow symbol
<-before, is a read-only channel, such as<-chan int - Arrow symbol
<-after, is a write-only channel, such aschan<- string
When attempting to write data to a read-only pipeline, it will fail to compile
func main() {
  timeCh := time.After(time.Second)
  timeCh <- time.Now()
}
The error is as follows, the meaning is very clear
invalid operation: cannot send to receive-only channel timeCh (variable of type <-chan time.Time)The same applies to reading data from a write-only pipeline.
Bidirectional pipelines can be converted to unidirectional pipelines, but not the other way around. Usually, when passing a bidirectional pipeline to a goroutine or function and not wanting it to read/send data, you can use a unidirectional pipeline to restrict the other party's behavior.
func main() {
   ch := make(chan int, 1)
   go write(ch)
   fmt.Println(<-ch)
}

func write(ch chan<- int) {
   // Can only send data to the pipeline
   ch <- 1
}
The same applies to read-only pipelines
TIP
chan is a reference type. Even though Go's function parameters are passed by value, their reference is still the same. This point will be explained in the subsequent pipeline principles.
for range
Through the for range statement, you can iterate and read data from a buffered pipeline, as in the following example
func main() {
  ch := make(chan int, 10)
  go func() {
    for i := 0; i < 10; i++ {
      ch <- i
    }
  }()
  for n := range ch {
    fmt.Println(n)
  }
}
Usually, when for range iterates over other iterable data structures, there are two return values, the first is the index, and the second is the element value. But for pipelines, there is only one return value. for range will continuously read elements from the pipeline. When the pipeline buffer is empty or unbuffered, it will block and wait until another goroutine writes data to the pipeline before continuing to read data. So the output is as follows:
0
1
2
3
4
5
6
7
8
9
fatal error: all goroutines are asleep - deadlock!
You can see that the above code caused a deadlock because the child goroutine has already finished executing, while the main goroutine is still blocking and waiting for other goroutines to write data to the pipeline. Therefore, the pipeline should be closed after writing is complete. Modify the code as follows
func main() {
   ch := make(chan int, 10)
   go func() {
      for i := 0; i < 10; i++ {
         ch <- i
      }
      // Close pipeline
      close(ch)
   }()
   for n := range ch {
      fmt.Println(n)
   }
}
After writing, close the pipeline, and the above code will no longer cause a deadlock. As mentioned earlier, reading from a pipeline has two return values. When for range iterates over a pipeline, when data cannot be successfully read, it will exit the loop. The second return value indicates whether data can be successfully read, not whether the pipeline has been closed. Even if the pipeline has been closed, for a buffered pipeline, data can still be read, and the second return value is still true. Look at the following example
func main() {
  ch := make(chan int, 10)
  for i := 0; i < 5; i++ {
    ch <- i
  }
    // Close pipeline
  close(ch)
    // Read data again
  for i := 0; i < 6; i++ {
    n, ok := <-ch
    fmt.Println(n, ok)
  }
}
Output result
0 true
1 true
2 true
3 true
4 true
0 false
Since the pipeline has been closed, even if the buffer is empty, reading data again will not cause the current goroutine to block. You can see that on the sixth iteration, the read value is zero, and ok is false.
TIP
Regarding the timing of pipeline closure, you should try to close the pipeline on the side that sends data to the pipeline, rather than on the receiving side, because in most cases the receiving side only knows to receive data and doesn't know when to close the pipeline.
WaitGroup
sync.WaitGroup is a struct provided by the sync package. WaitGroup means waiting for execution. Using it, you can easily achieve the effect of waiting for a group of goroutines. This struct only exposes three methods.
The Add method is used to specify the number of goroutines to wait for
func (wg *WaitGroup) Add(delta int)The Done method indicates that the current goroutine has finished executing
func (wg *WaitGroup) Done()The Wait method waits for child goroutines to finish, otherwise it blocks
func (wg *WaitGroup) Wait()WaitGroup is very simple to use, ready to use out of the box. Its internal implementation is a counter + semaphore. At the beginning of the program, Add is called to initialize the count. Whenever a goroutine finishes executing, Done is called, and the count decreases by 1 until it reaches 0. During this period, the main goroutine calling Wait will keep blocking until all counts decrease to 0, then it will be awakened. Look at a simple usage example
func main() {
  var wait sync.WaitGroup
  // Specify the number of child goroutines
  wait.Add(1)
  go func() {
    fmt.Println(1)
    // Execution complete
    wait.Done()
  }()
  // Wait for child goroutines
  wait.Wait()
  fmt.Println(2)
}
This code will always output 1 first, then 2. The main goroutine will wait for the child goroutine to finish before exiting.
1
2
For the first example in the goroutine introduction, you can make the following modifications
func main() {
   var mainWait sync.WaitGroup
   var wait sync.WaitGroup
   // Count 10
   mainWait.Add(10)
   fmt.Println("start")
   for i := 0; i < 10; i++ {
      // Count 1 within the loop
      wait.Add(1)
      go func() {
         fmt.Println(i)
         // Both counts -1
         wait.Done()
         mainWait.Done()
      }()
      // Wait for the current loop's goroutine to finish
      wait.Wait()
   }
   // Wait for all goroutines to finish
   mainWait.Wait()
   fmt.Println("end")
}
Here, sync.WaitGroup is used to replace the original time.Sleep. The concurrent execution order of goroutines is more controllable. No matter how many times it's executed, the output is as follows
start
0
1
2
3
4
5
6
7
8
9
end
WaitGroup is usually suitable when the number of goroutines can be dynamically adjusted, for example, when the number of goroutines is known in advance, or when it needs to be dynamically adjusted during runtime. The value of WaitGroup should not be copied, and the copied value should not continue to be used, especially when passing it as a function parameter, you should pass a pointer instead of a value. If you use a copied value, the count will not work on the real WaitGroup at all, which may cause the main goroutine to block and wait forever, and the program will not run normally. For example, the following code
func main() {
  var mainWait sync.WaitGroup
  mainWait.Add(1)
  hello(mainWait)
  mainWait.Wait()
  fmt.Println("end")
}
func hello(wait sync.WaitGroup) {
  fmt.Println("hello")
  wait.Done()
}
The error indicates that all goroutines have exited, but the main goroutine is still waiting, which forms a deadlock. Because calling Done on a parameter WaitGroup inside the hello function will not work on the original mainWait, so you should use a pointer to pass it.
hello
fatal error: all goroutines are asleep - deadlock!
TIP
When the count becomes negative, or the count is greater than the number of child goroutines, it will cause panic.
Context
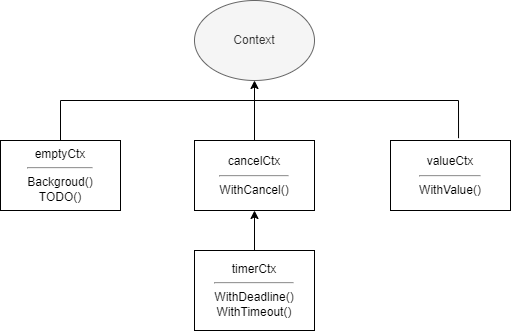
Context, translated as context, is a concurrency control solution provided by Go. Compared with pipelines and WaitGroup, it can better control child goroutines and deeper-level goroutines. Context itself is an interface, and anything that implements this interface can be called a context, such as gin.Context in the famous web framework Gin. The context standard library also provides several implementations, namely:
emptyCtxcancelCtxtimerCtxvalueCtx
Context
Let's first look at the definition of the Context interface, then understand its specific implementation.
type Context interface {

   Deadline() (deadline time.Time, ok bool)

   Done() <-chan struct{}

   Err() error

   Value(key any) any
}
Deadline
This method has two return values. deadline is the deadline, i.e., the time when the context should be cancelled. The second value is whether deadline is set. If not set, it will always be false.
Deadline() (deadline time.Time, ok bool)Done
Its return value is a read-only pipeline of empty struct type. This pipeline only serves as a notification and does not transmit any data. When the work done by the context should be cancelled, this channel will be closed. For some contexts that don't support cancellation, it may return nil.
Done() <-chan struct{}Err
This method returns an error to indicate the reason for the context closure. When the Done pipeline is not closed, it returns nil. If it is closed, it will return an err to explain why it was closed.
Err() errorValue
This method returns the corresponding key value. If the key doesn't exist, or this method is not supported, it will return nil.
Value(key any) anyemptyCtx
As the name suggests, emptyCtx is an empty context. All implementations under the context package are not exposed externally, but corresponding functions are provided to create contexts. emptyCtx can be created through context.Background and context.TODO. The two functions are as follows
var (
  background = new(emptyCtx)
  todo       = new(emptyCtx)
)

func Background() Context {
  return background
}

func TODO() Context {
  return todo
}
You can see that it just returns an emptyCtx pointer. The underlying type of emptyCtx is actually an int. The reason for not using an empty struct is that emptyCtx instances must have different memory addresses. It can't be cancelled, has no deadline, and can't get values. The implemented methods all return zero values.
type emptyCtx int

func (*emptyCtx) Deadline() (deadline time.Time, ok bool) {
   return
}

func (*emptyCtx) Done() <-chan struct{} {
   return nil
}

func (*emptyCtx) Err() error {
   return nil
}

func (*emptyCtx) Value(key any) any {
   return nil
}
emptyCtx is usually used as the top-level context, passed as a parent context when creating the other three types of contexts. The relationship between various implementations in the context package is shown in the figure below
valueCtx
valueCtx has a relatively simple implementation. It internally contains only one key-value pair and an embedded Context type field.
type valueCtx struct {
   Context
   key, val any
}
It only implements the Value method, and the logic is also very simple. If the current context can't find it, it goes to the parent context to find it.
func (c *valueCtx) Value(key any) any {
   if c.key == key {
      return c.val
   }
   return value(c.Context, key)
}
Let's look at a simple usage case of valueCtx
var waitGroup sync.WaitGroup

func main() {
  waitGroup.Add(1)
    // Pass context
  go Do(context.WithValue(context.Background(), 1, 2))
  waitGroup.Wait()
}

func Do(ctx context.Context) {
    // Create timer
  ticker := time.NewTimer(time.Second)
  defer waitGroup.Done()
  for {
    select {
    case <-ctx.Done(): // Will never execute
    case <-ticker.C:
      fmt.Println("timeout")
      return
    default:
      fmt.Println(ctx.Value(1))
    }
    time.Sleep(time.Millisecond * 100)
  }
}
valueCtx is mostly used to pass some data in multi-level goroutines. It cannot be cancelled, so ctx.Done will always return nil, and select will ignore nil pipelines. The final output is as follows
2
2
2
2
2
2
2
2
2
2
timeout
cancelCtx
Both cancelCtx and timerCtx implement the canceler interface. The interface type is as follows
type canceler interface {
    // removeFromParent indicates whether to remove itself from the parent context
    // err indicates the reason for cancellation
  cancel(removeFromParent bool, err error)
    // Done returns a pipeline for notifying the reason for cancellation
  Done() <-chan struct{}
}
The cancel method is not exposed externally. When creating a context, it is wrapped as a return value through a closure for external calling, as shown in the context.WithCancel source code
func WithCancel(parent Context) (ctx Context, cancel CancelFunc) {
   if parent == nil {
      panic("cannot create context from nil parent")
   }
   c := newCancelCtx(parent)
   // Try to add itself to the parent's children
   propagateCancel(parent, &c)
   // Return context and a function
   return &c, func() { c.cancel(true, Canceled) }
}
cancelCtx is translated as a cancellable context. When created, if the parent implements canceler, it will add itself to the parent's children, otherwise it will keep searching upward. If none of the parents implement canceler, it will start a goroutine to wait for the parent to cancel, then cancel the current context when the parent ends. When cancelFunc is called, the Done channel will be closed, and any children of this context will also be cancelled. Finally, it will remove itself from the parent. Below is a simple example:
var waitGroup sync.WaitGroup

func main() {
  bkg := context.Background()
    // Returns a cancelCtx and cancel function
  cancelCtx, cancel := context.WithCancel(bkg)
  waitGroup.Add(1)
  go func(ctx context.Context) {
    defer waitGroup.Done()
    for {
      select {
      case <-ctx.Done():
        fmt.Println(ctx.Err())
        return
      default:
        fmt.Println("Waiting for cancellation...")
      }
      time.Sleep(time.Millisecond * 200)
    }

  }(cancelCtx)
  time.Sleep(time.Second)
  cancel()
  waitGroup.Wait()
}
Output is as follows
Waiting for cancellation...
Waiting for cancellation...
Waiting for cancellation...
Waiting for cancellation...
Waiting for cancellation...
context canceled
Let's look at another example with deeper nesting
var waitGroup sync.WaitGroup

func main() {
   waitGroup.Add(3)
   ctx, cancelFunc := context.WithCancel(context.Background())
   go HttpHandler(ctx)
   time.Sleep(time.Second)
   cancelFunc()
   waitGroup.Wait()
}

func HttpHandler(ctx context.Context) {
   cancelCtxAuth, cancelAuth := context.WithCancel(ctx)
   cancelCtxMail, cancelMail := context.WithCancel(ctx)

   defer cancelAuth()
   defer cancelMail()
   defer waitGroup.Done()

   go AuthService(cancelCtxAuth)
   go MailService(cancelCtxMail)

   for {
      select {
      case <-ctx.Done():
         fmt.Println(ctx.Err())
         return
      default:
         fmt.Println("Processing http request...")
      }
      time.Sleep(time.Millisecond * 200)
   }

}

func AuthService(ctx context.Context) {
   defer waitGroup.Done()
   for {
      select {
      case <-ctx.Done():
         fmt.Println("auth parent cancelled", ctx.Err())
         return
      default:
         fmt.Println("auth...")
      }
      time.Sleep(time.Millisecond * 200)
   }
}

func MailService(ctx context.Context) {
   defer waitGroup.Done()
   for {
      select {
      case <-ctx.Done():
         fmt.Println("mail parent cancelled", ctx.Err())
         return
      default:
         fmt.Println("mail...")
      }
      time.Sleep(time.Millisecond * 200)
   }
}
In the example, 3 cancelCtx are created. Although the parent cancelCtx will cancel its child contexts when it is cancelled, to be safe, if a cancelCtx is created, the cancel function should be called after the corresponding process ends. The output is as follows
Processing http request...
auth...
mail...
mail...
auth...
Processing http request...
auth...
mail...
Processing http request...
Processing http request...
auth...
mail...
auth...
Processing http request...
mail...
context canceled
auth parent cancelled context canceled
mail parent cancelled context canceled
timerCtx
timerCtx adds a timeout mechanism on top of cancelCtx. The context package provides two functions for creation, namely WithDeadline and WithTimeout. Both have similar functions. The former specifies a specific timeout time, such as specifying a specific time 2023/3/20 16:32:00, while the latter specifies a timeout time interval, such as 5 minutes from now. The signatures of the two functions are as follows
func WithDeadline(parent Context, d time.Time) (Context, CancelFunc)

func WithTimeout(parent Context, timeout time.Duration) (Context, CancelFunc)
timerCtx will automatically cancel the current context after the time expires. The cancellation process, except for the extra step of closing the timer, is basically the same as cancelCtx. Below is a simple usage example of timerCtx
var wait sync.WaitGroup

func main() {
  deadline, cancel := context.WithDeadline(context.Background(), time.Now().Add(time.Second))
  defer cancel()
  wait.Add(1)
  go func(ctx context.Context) {
    defer wait.Done()
    for {
      select {
      case <-ctx.Done():
        fmt.Println("Context cancelled", ctx.Err())
        return
      default:
        fmt.Println("Waiting for cancellation...")
      }
      time.Sleep(time.Millisecond * 200)
    }
  }(deadline)
  wait.Wait()
}
Although the context will automatically cancel when it expires, to be safe, it's best to manually cancel the context after the relevant process ends. The output is as follows
Waiting for cancellation...
Waiting for cancellation...
Waiting for cancellation...
Waiting for cancellation...
Waiting for cancellation...
Context cancelled context deadline exceeded
WithTimeout is actually very similar to WithDeadline. Its implementation is just a slight wrapper and calls WithDeadline. The usage is the same as WithDeadline in the above example, as follows
func WithTimeout(parent Context, timeout time.Duration) (Context, CancelFunc) {
   return WithDeadline(parent, time.Now().Add(timeout))
}
TIP
Just like memory leaks caused by not reclaiming memory after allocation, context is also a resource. If you create it but never cancel it, it will also cause context leaks, so it's best to avoid this situation.
Select
select in Linux systems is an IO multiplexing solution. Similarly, in Go, select is a pipeline multiplexing control structure. What is multiplexing? Simply put in one sentence: at a certain moment, simultaneously monitor whether multiple elements are available. The monitored elements can be network requests, file IO, etc. In Go, select monitors pipelines, and only pipelines. The syntax of select is similar to the switch statement. Let's see what a select statement looks like
func main() {
  // Create three pipelines
  chA := make(chan int)
  chB := make(chan int)
  chC := make(chan int)
  defer func() {
    close(chA)
    close(chB)
    close(chC)
  }()
  select {
  case n, ok := <-chA:
    fmt.Println(n, ok)
  case n, ok := <-chB:
    fmt.Println(n, ok)
  case n, ok := <-chC:
    fmt.Println(n, ok)
  default:
    fmt.Println("All pipelines are unavailable")
  }
}
Usage
Similar to switch, select consists of multiple case statements and one default. The default branch can be omitted. Each case can only operate on one pipeline, and only one operation, either read or write. When multiple case statements are available, select will pseudo-randomly choose one case to execute. If all case statements are unavailable, the default branch will be executed. If there is no default branch, it will block and wait until at least one case is available. Since no data was written to the pipelines in the above example, naturally all case statements are unavailable, so the final output is the execution result of the default branch. Let's modify it slightly:
func main() {
   chA := make(chan int)
   chB := make(chan int)
   chC := make(chan int)
   defer func() {
      close(chA)
      close(chB)
      close(chC)
   }()
   // Start a new goroutine
   go func() {
      // Write data to pipeline A
      chA <- 1
   }()
   select {
   case n, ok := <-chA:
      fmt.Println(n, ok)
   case n, ok := <-chB:
      fmt.Println(n, ok)
   case n, ok := <-chC:
      fmt.Println(n, ok)
   }
}
The above example starts a new goroutine to write data to pipeline A. Since select has no default branch, it will block and wait until a case is available. When pipeline A is available, after executing the corresponding branch, the main goroutine exits directly. To continuously monitor pipelines, you can use it with a for loop, as follows.
func main() {
  chA := make(chan int)
  chB := make(chan int)
  chC := make(chan int)
  defer func() {
    close(chA)
    close(chB)
    close(chC)
  }()
  go Send(chA)
  go Send(chB)
  go Send(chC)
  // for loop
  for {
    select {
    case n, ok := <-chA:
      fmt.Println("A", n, ok)
    case n, ok := <-chB:
      fmt.Println("B", n, ok)
    case n, ok := <-chC:
      fmt.Println("C", n, ok)
    }
  }
}

func Send(ch chan<- int) {
  for i := 0; i < 3; i++ {
    time.Sleep(time.Millisecond)
    ch <- i
  }
}
This does allow all three pipelines to be used, but an infinite loop + select will cause the main goroutine to block permanently, so you can put it in a new goroutine separately and add some other logic.
func main() {
  chA := make(chan int)
  chB := make(chan int)
  chC := make(chan int)
  defer func() {
    close(chA)
    close(chB)
    close(chC)
  }()

  l := make(chan struct{})

  go Send(chA)
  go Send(chB)
  go Send(chC)

  go func() {
  Loop:
    for {
      select {
      case n, ok := <-chA:
        fmt.Println("A", n, ok)
      case n, ok := <-chB:
        fmt.Println("B", n, ok)
      case n, ok := <-chC:
        fmt.Println("C", n, ok)
      case <-time.After(time.Second): // Set 1 second timeout
        break Loop // Exit loop
      }
    }
    l <- struct{}{} // Tell main goroutine it can exit
  }()

  <-l
}

func Send(ch chan<- int) {
  for i := 0; i < 3; i++ {
    time.Sleep(time.Millisecond)
    ch <- i
  }
}
In the above example, for loop combined with select is used to continuously monitor whether the three pipelines are available, and the fourth case is a timeout pipeline. After timeout, it will exit the loop and end the child goroutine. The final output is as follows
C 0 true
A 0 true
B 0 true
A 1 true
B 1 true
C 1 true
B 2 true
C 2 true
A 2 true
Timeout
The previous example used the time.After function, which returns a read-only pipeline. This function combined with select can very simply implement a timeout mechanism, as in the following example
func main() {
  chA := make(chan int)
  defer close(chA)
  go func() {
    time.Sleep(time.Second * 2)
    chA <- 1
  }()
  select {
  case n := <-chA:
    fmt.Println(n)
  case <-time.After(time.Second):
    fmt.Println("timeout")
  }
}
Permanent Blocking
When there is nothing in the select statement, it will block permanently, for example
func main() {
  fmt.Println("start")
  select {}
  fmt.Println("end")
}
end will never be output, the main goroutine will block forever, this situation generally has special purposes.
TIP
In the case of select, if you operate on a pipeline with a nil value, it won't cause blocking, and that case will be ignored and never executed. For example, the following code will only output timeout no matter how many times it's executed.
func main() {
   var nilCh chan int
   select {
   case <-nilCh:
      fmt.Println("read")
   case nilCh <- 1:
      fmt.Println("write")
   case <-time.After(time.Second):
      fmt.Println("timeout")
   }
}
Non-blocking
By using the default branch of select combined with pipelines, we can implement non-blocking send and receive operations, as shown below
func TrySend(ch chan int, ele int) bool  {
	select {
	case ch <- ele:
		return true
	default:
		return false
	}
}

func TryRecv(ch chan int) (int, bool)  {
	select {
	case ele, ok := <-ch:
		return ele, ok
	default:
		return 0, false
	}
}
Similarly, you can also implement non-blocking checking of whether a context has ended
func IsDone(ctx context.Context) bool {
	select {
	case <-ctx.Done():
		return true
	default:
		return false
	}
}
Lock
Let's first look at an example
var wait sync.WaitGroup
var count = 0

func main() {
   wait.Add(10)
   for i := 0; i < 10; i++ {
      go func(data *int) {
         // Simulate access time
         time.Sleep(time.Millisecond * time.Duration(rand.Intn(5000)))
         // Access data
         temp := *data
         // Simulate calculation time
         time.Sleep(time.Millisecond * time.Duration(rand.Intn(5000)))
         ans := 1
         // Modify data
         *data = temp + ans
         fmt.Println(*data)
         wait.Done()
      }(&count)
   }
   wait.Wait()
   fmt.Println("Final result", count)
}
For the above example, 10 goroutines are started to perform +1 operations on count, and time.Sleep is used to simulate different time consumption. According to intuition, 10 goroutines performing 10 +1 operations, the final result must be 10, and the correct result is indeed 10, but the fact is not so. The execution result of the above example is as follows:
1
2
3
3
2
2
3
3
3
4
Final result 4
You can see that the final result is 4, and this is just one of many possible results. Since each goroutine takes different time to access and calculate, goroutine A takes 500 milliseconds to access data, and the accessed count value is 1, then it takes another 400 milliseconds to calculate, but during these 400 milliseconds, goroutine B has already completed access and calculation and successfully updated the count value. After goroutine A finishes calculating, the value originally accessed by goroutine A is already outdated, but goroutine A doesn't know this and still adds one to the originally accessed value and assigns it to count. In this way, goroutine B's execution result is overwritten. This problem especially occurs when multiple goroutines read and access shared data, so locks are needed.
Go's sync package provides Mutex and RWMutex implementations for mutex locks and read-write locks, and provides very simple and easy-to-use APIs. Locking only requires Lock(), and unlocking only requires Unlock(). Note that all locks provided by Go are non-recursive locks, i.e., non-reentrant locks, so repeated locking or repeated unlocking will cause fatal. The meaning of locks is to protect invariants. Locking is to hope that data won't be modified by other goroutines, as follows
func DoSomething() {
  Lock()
    // During this process, data won't be modified by other goroutines
  Unlock()
}
If it were a recursive lock, the following situation might occur
func DoSomething() {
  Lock()
    DoOther()
  Unlock()
}

func DoOther() {
  Lock()
  // do other
  Unlock()
}
The DoSomething function obviously doesn't know what the DoOther function might do to the data, thus modifying the data, such as starting a few more child goroutines that break the invariant. This doesn't work in Go. Once locked, you must ensure the immutability of invariants. At this point, repeated locking and unlocking will cause deadlocks. So when writing code, you should avoid the above situation. When necessary, use defer statements to unlock immediately after locking.
Mutex Lock
sync.Mutex is Go's mutex lock implementation, which implements the sync.Locker interface
type Locker interface {
   // Lock
   Lock()
   // Unlock
   Unlock()
}
Using a mutex lock can perfectly solve the above problem, as in the following example
var wait sync.WaitGroup
var count = 0

var lock sync.Mutex

func main() {
  wait.Add(10)
  for i := 0; i < 10; i++ {
    go func(data *int) {
      // Lock
      lock.Lock()
      // Simulate access time
      time.Sleep(time.Millisecond * time.Duration(rand.Intn(1000)))
      // Access data
      temp := *data
      // Simulate calculation time
      time.Sleep(time.Millisecond * time.Duration(rand.Intn(1000)))
      ans := 1
      // Modify data
      *data = temp + ans
      // Unlock
      lock.Unlock()
      fmt.Println(*data)
      wait.Done()
    }(&count)
  }
  wait.Wait()
  fmt.Println("Final result", count)
}
Each goroutine locks before accessing data, and unlocks after updating is complete. Other goroutines that want to access must first acquire the lock, otherwise they block and wait. In this way, the above problem no longer exists, so the output is as follows
1
2
3
4
5
6
7
8
9
10
Final result 10
Read-Write Lock
Mutex locks are suitable for situations where read and write operations have similar frequency. For some data with more reads and fewer writes, if you use a mutex lock, it will cause a large number of unnecessary goroutines to compete for locks, which will consume a lot of system resources. In this case, you need to use a read-write lock, i.e., read-write mutex lock. For a goroutine:
- If it acquires a read lock, other goroutines will block when performing write operations, but other goroutines won't block when performing read operations
- If it acquires a write lock, other goroutines will block when performing write operations, and other goroutines will also block when performing read operations
Go's read-write mutex lock implementation is sync.RWMutex, which also implements the Locker interface, but provides more available methods, as follows:
// Acquire read lock
func (rw *RWMutex) RLock()

// Try to acquire read lock
func (rw *RWMutex) TryRLock() bool

// Release read lock
func (rw *RWMutex) RUnlock()

// Acquire write lock
func (rw *RWMutex) Lock()

// Try to acquire write lock
func (rw *RWMutex) TryLock() bool

// Release write lock
func (rw *RWMutex) Unlock()
Among them, TryRLock and TryLock are non-blocking operations. Successfully locking returns true, and when unable to acquire the lock, it doesn't block but returns false. The internal implementation of read-write mutex lock is still a mutex lock. It doesn't mean that having read locks and write locks means there are two locks. From beginning to end, there is only one lock. Let's look at a usage case of read-write mutex lock
var wait sync.WaitGroup
var count = 0

var rw sync.RWMutex

func main() {
  wait.Add(12)
  // More reads, fewer writes
  go func() {
    for i := 0; i < 3; i++ {
      go Write(&count)
    }
    wait.Done()
  }()
  go func() {
    for i := 0; i < 7; i++ {
      go Read(&count)
    }
    wait.Done()
  }()
  // Wait for child goroutines to end
  wait.Wait()
  fmt.Println("Final result", count)
}

func Read(i *int) {
  time.Sleep(time.Millisecond * time.Duration(rand.Intn(500)))
  rw.RLock()
  fmt.Println("Acquired read lock")
  time.Sleep(time.Millisecond * time.Duration(rand.Intn(1000)))
  fmt.Println("Released read lock", *i)
  rw.RUnlock()
  wait.Done()
}

func Write(i *int) {
  time.Sleep(time.Millisecond * time.Duration(rand.Intn(1000)))
  rw.Lock()
  fmt.Println("Acquired write lock")
  temp := *i
  time.Sleep(time.Millisecond * time.Duration(rand.Intn(1000)))
  *i = temp + 1
  fmt.Println("Released write lock", *i)
  rw.Unlock()
  wait.Done()
}
This example starts 3 write goroutines and 7 read goroutines. When reading data, they first acquire read locks. Read goroutines can normally acquire read locks, but they will block write goroutines. When acquiring write locks, they will block both read goroutines and write goroutines until the write lock is released. In this way, read goroutines and write goroutines are mutually exclusive, ensuring data correctness. The example output is as follows:
Acquired read lock
Acquired read lock
Acquired read lock
Acquired read lock
Released read lock 0
Released read lock 0
Released read lock 0
Released read lock 0
Acquired write lock
Released write lock 1
Acquired read lock
Acquired read lock
Acquired read lock
Released read lock 1
Released read lock 1
Released read lock 1
Acquired write lock
Released write lock 2
Acquired write lock
Released write lock 3
Final result 3
TIP
For locks, they should not be passed and stored as values, pointers should be used.
Condition Variable
Condition variable, appears and is used together with mutex locks, so some people might mistakenly call it a condition lock, but it is not a lock, it is a communication mechanism. Go's sync.Cond provides an implementation for this, and the function signature for creating a condition variable is as follows:
func NewCond(l Locker) *CondYou can see that the prerequisite for creating a condition variable is to create a lock. sync.Cond provides the following methods for use
// Block and wait for condition to take effect until awakened
func (c *Cond) Wait()

// Wake up one goroutine blocked by condition
func (c *Cond) Signal()

// Wake up all goroutines blocked by condition
func (c *Cond) Broadcast()
Condition variables are very simple to use. Just slightly modify the read-write mutex lock example above
var wait sync.WaitGroup
var count = 0

var rw sync.RWMutex

// Condition variable
var cond = sync.NewCond(rw.RLocker())

func main() {
  wait.Add(12)
  // More reads, fewer writes
  go func() {
    for i := 0; i < 3; i++ {
      go Write(&count)
    }
    wait.Done()
  }()
  go func() {
    for i := 0; i < 7; i++ {
      go Read(&count)
    }
    wait.Done()
  }()
  // Wait for child goroutines to end
  wait.Wait()
  fmt.Println("Final result", count)
}

func Read(i *int) {
  time.Sleep(time.Millisecond * time.Duration(rand.Intn(500)))
  rw.RLock()
  fmt.Println("Acquired read lock")
  // Block while condition is not satisfied
  for *i < 3 {
    cond.Wait()
  }
  time.Sleep(time.Millisecond * time.Duration(rand.Intn(1000)))
  fmt.Println("Released read lock", *i)
  rw.RUnlock()
  wait.Done()
}

func Write(i *int) {
  time.Sleep(time.Millisecond * time.Duration(rand.Intn(1000)))
  rw.Lock()
  fmt.Println("Acquired write lock")
  temp := *i
  time.Sleep(time.Millisecond * time.Duration(rand.Intn(1000)))
  *i = temp + 1
  fmt.Println("Released write lock", *i)
  rw.Unlock()
  // Wake up all goroutines blocked by condition variable
  cond.Broadcast()
  wait.Done()
}
When creating the condition variable, since the condition variable here acts on read goroutines, the read lock is passed as the mutex lock. If the read-write mutex lock is passed directly, it will cause the problem of repeated unlocking by write goroutines. What's passed here is sync.rlocker, obtained through the RWMutex.RLocker method.
func (rw *RWMutex) RLocker() Locker {
   return (*rlocker)(rw)
}

type rlocker RWMutex

func (r *rlocker) Lock()   { (*RWMutex)(r).RLock() }
func (r *rlocker) Unlock() { (*RWMutex)(r).RUnlock() }
You can see that rlocker just wraps the read lock operation of the read-write mutex lock. It's actually the same reference, still the same lock. When read goroutines read data, if it's less than 3, they will keep blocking and waiting until the data is greater than 3. Write goroutines will try to wake up all goroutines blocked by the condition variable after updating data. So the final output is as follows
Acquired read lock
Acquired read lock
Acquired read lock
Acquired read lock
Acquired write lock
Released write lock 1
Acquired read lock
Acquired write lock
Released write lock 2
Acquired read lock
Acquired read lock
Acquired write lock
Released write lock 3 // Third write goroutine finished executing
Released read lock 3
Released read lock 3
Released read lock 3
Released read lock 3
Released read lock 3
Released read lock 3
Released read lock 3
Final result 3
From the results, you can see that after the third write goroutine finishes updating data, all seven read goroutines blocked by the condition variable resumed running.
TIP
For condition variables, you should use for instead of if. You should use a loop to judge whether the condition is satisfied, because when a goroutine is awakened, it cannot be guaranteed that the current condition is already satisfied.
for !condition {
  cond.Wait()
}
sync
A large part of Go's concurrency-related tools are provided by the sync standard library. The above has already introduced sync.WaitGroup, sync.Locker, etc. In addition, the sync package has some other tools available.
Once
When using some data structures, if these data structures are too large, you can consider using lazy loading, i.e., initializing the data structure only when it's really needed. As in the following example
type MySlice []int

func (m *MySlice) Get(i int) (int, bool) {
   if *m == nil {
      return 0, false
   } else {
      return (*m)[i], true
   }
}

func (m *MySlice) Add(i int) {
   // Only consider initialization when the slice is actually used
   if *m == nil {
      *m = make([]int, 0, 10)
   }
   *m = append(*m, i)
}
So the problem arises. If only one goroutine uses it, there's certainly no problem, but if multiple goroutines access it, problems might occur. For example, goroutines A and B both call the Add method at the same time. A executes a bit faster and has already finished initializing and successfully added data. Then goroutine B initializes again, which directly overwrites the data added by goroutine A. This is the problem.
And this is the problem that sync.Once wants to solve. As the name suggests, Once means one time. sync.Once guarantees that a specified operation will only execute once under concurrent conditions. Its use is very simple, only exposing a Do method, with the signature:
func (o *Once) Do(f func())When using it, you just need to pass the initialization operation into the Do method, as follows
var wait sync.WaitGroup

func main() {
  var slice MySlice
  wait.Add(4)
  for i := 0; i < 4; i++ {
    go func() {
      slice.Add(1)
      wait.Done()
    }()
  }
  wait.Wait()
  fmt.Println(slice.Len())
}

type MySlice struct {
  s []int
  o sync.Once
}

func (m *MySlice) Get(i int) (int, bool) {
  if m.s == nil {
    return 0, false
  } else {
    return m.s[i], true
  }
}

func (m *MySlice) Add(i int) {
  // Only consider initialization when the slice is actually used
  m.o.Do(func() {
    fmt.Println("Initialize")
    if m.s == nil {
      m.s = make([]int, 0, 10)
    }
  })
  m.s = append(m.s, i)
}

func (m *MySlice) Len() int {
  return len(m.s)
}
Output is as follows
Initialize
4
From the output result, you can see that all data is normally added to the slice, and the initialization operation only executed once. In fact, the implementation of sync.Once is quite simple. Removing comments, the real code logic is only 16 lines. Its principle is lock + atomic operation. The source code is as follows:
type Once struct {
    // Used to judge whether the operation has been executed
  done uint32
  m    Mutex
}

func (o *Once) Do(f func()) {
  // Atomically load data
  if atomic.LoadUint32(&o.done) == 0 {
    o.doSlow(f)
  }
}

func (o *Once) doSlow(f func()) {
    // Lock
  o.m.Lock()
    // Unlock
  defer o.m.Unlock()
    // Judge whether executed
  if o.done == 0 {
        // Modify done after execution
    defer atomic.StoreUint32(&o.done, 1)
    f()
  }
}
Pool
sync.Pool is designed to store temporary objects for subsequent reuse. It's a temporary concurrent-safe object pool. Objects that are temporarily unused are put into the pool, so during subsequent use, you don't need to create objects additionally and can reuse them directly, reducing the frequency of memory allocation and release. Most importantly, it reduces GC pressure. sync.Pool has only two methods, as follows:
// Request an object
func (p *Pool) Get() any

// Put an object
func (p *Pool) Put(x any)
And sync.Pool has an exposed New field, used to initialize an object when the object pool cannot request an object
New func() anyLet's demonstrate with an example
var wait sync.WaitGroup

// Temporary object pool
var pool sync.Pool

// Used to count how many objects were created in total during the process
var numOfObject atomic.Int64

// BigMemData assuming this is a struct that occupies a lot of memory
type BigMemData struct {
   M string
}

func main() {
   pool.New = func() any {
      numOfObject.Add(1)
      return BigMemData{"Big memory"}
   }
   wait.Add(1000)
   // Here start 1000 goroutines
   for i := 0; i < 1000; i++ {
      go func() {
         // Request object
         val := pool.Get()
         // Use object
         _ = val.(BigMemData)
         // Release object after use
         pool.Put(val)
         wait.Done()
      }()
   }
   wait.Wait()
   fmt.Println(numOfObject.Load())
}
In the example, 1000 goroutines are started to constantly request and release objects in the pool. If an object pool is not used, then 1000 goroutines all need to instantiate objects separately, and these 1000 instantiated objects need to be released from memory by GC after use. If there are hundreds of thousands of goroutines or the cost of creating this object is very high, in this case, it will occupy a lot of memory and bring great pressure to GC. After using an object pool, objects can be reused to reduce the frequency of instantiation. For example, the output of the above example might be as follows:
5Even with 1000 goroutines started, only 5 objects were created during the entire process. If an object pool is not used, 1000 goroutines would create 1000 objects. The improvement brought by this optimization is obvious, especially when concurrency is particularly high and the cost of instantiating objects is particularly high, the advantage is more obvious.
When using sync.Pool, you need to pay attention to several points:
- Temporary objects:
sync.Poolis only suitable for storing temporary objects. Objects in the pool may be removed by GC without any notification, so it's not recommended to store network connections, database connections, etc. insync.Pool. - Unpredictable: When requesting objects from
sync.Pool, you cannot predict whether this object is newly created or reused, nor can you know how many objects are in the pool - Concurrent safety: The official guarantee is that
sync.Poolis definitely concurrent-safe, but it doesn't guarantee that theNewfunction used to create objects is definitely concurrent-safe. TheNewfunction is passed in by the user, so the concurrent safety of theNewfunction needs to be maintained by the user themselves. This is also why atomic values are used for object counting in the above example.
TIP
Finally, note that after using an object, it must be released back to the pool. If you use it without releasing it, the use of the object pool will be meaningless.
The standard library fmt package has a use case of object pool, in the fmt.Fprintf function
func Fprintf(w io.Writer, format string, a ...any) (n int, err error) {
   // Request a print buffer
   p := newPrinter()
   p.doPrintf(format, a)
   n, err = w.Write(p.buf)
   // Release after use
   p.free()
   return
}
The implementations of the newPointer function and free method are as follows
func newPrinter() *pp {
   // Request an object from the object pool
   p := ppFree.Get().(*pp)
   p.panicking = false
   p.erroring = false
   p.wrapErrs = false
   p.fmt.init(&p.buf)
   return p
}

func (p *pp) free() {
    // To keep buffer sizes in the object pool roughly the same for better elastic control of buffer size
    // Oversized buffers are not put back into the object pool
  if cap(p.buf) > 64<<10 {
    return
  }
  // Reset fields and release object to pool
  p.buf = p.buf[:0]
  p.arg = nil
  p.value = reflect.Value{}
  p.wrappedErr = nil
  ppFree.Put(p)
}
Map
sync.Map is a concurrent-safe Map implementation provided officially. It's ready to use out of the box and very simple to use. Below are the methods exposed by this struct:
// Read value by key, return value will return the corresponding value and whether the value exists
func (m *Map) Load(key any) (value any, ok bool)

// Store a key-value pair
func (m *Map) Store(key, value any)

// Delete a key-value pair
func (m *Map) Delete(key any)

// If the key already exists, return the original value, otherwise store the new value and return. When successfully reading a value, loaded is true, otherwise false
func (m *Map) LoadOrStore(key, value any) (actual any, loaded bool)

// Delete a key-value pair and return its original value, the value of loaded depends on whether the key exists
func (m *Map) LoadAndDelete(key any) (value any, loaded bool)

// Iterate Map, when f() returns false, iteration will stop
func (m *Map) Range(f func(key, value any) bool)
Let's demonstrate the basic use of sync.Map with a simple example
func main() {
  var syncMap sync.Map
  // Store data
  syncMap.Store("a", 1)
  syncMap.Store("a", "a")
  // Read data
  fmt.Println(syncMap.Load("a"))
  // Read and delete
  fmt.Println(syncMap.LoadAndDelete("a"))
  // Read or store
  fmt.Println(syncMap.LoadOrStore("a", "hello world"))
  syncMap.Store("b", "goodbye world")
  // Iterate map
  syncMap.Range(func(key, value any) bool {
    fmt.Println(key, value)
    return true
  })
}
Output
a true
a true
hello world false
a hello world
b goodbye world
Next, let's look at an example of concurrent use of map:
func main() {
  myMap := make(map[int]int, 10)
  var wait sync.WaitGroup
  wait.Add(10)
  for i := 0; i < 10; i++ {
    go func(n int) {
      for i := 0; i < 100; i++ {
        myMap[n] = n
      }
      wait.Done()
    }(i)
  }
  wait.Wait()
}
In the above example, a normal map is used, and 10 goroutines are started to constantly store data. Obviously, this is likely to trigger fatal, and the result will most likely be as follows
fatal error: concurrent map writesUsing sync.Map can avoid this problem
func main() {
  var syncMap sync.Map
  var wait sync.WaitGroup
  wait.Add(10)
  for i := 0; i < 10; i++ {
    go func(n int) {
      for i := 0; i < 100; i++ {
        syncMap.Store(n, n)
      }
      wait.Done()
    }(i)
  }
  wait.Wait()
  syncMap.Range(func(key, value any) bool {
    fmt.Println(key, value)
    return true
  })
}
The output is as follows
8 8
3 3
1 1
9 9
6 6
5 5
7 7
0 0
2 2
4 4
To ensure concurrency safety, some sacrifices must be made; the performance of sync.Map is roughly 10–100× lower than that of a regular map.
Atomic
In computer science, atomic or primitive operations usually refer to actions that cannot be subdivided into smaller steps; because they are indivisible, no other goroutine can interrupt them before completion. Consequently, the outcome is either success or failure—there is no third possibility. If any other scenario occurs, it is not an atomic operation. Consider the following code:
func main() {
  a := 0
  if a == 0 {
    a = 1
  }
  fmt.Println(a)
}
The above code is a simple judgment branch, although it is only a few lines of code, it is not an atomic operation. The real atomic operation is supported by hardware instructions.
Type
In most cases, you do not need to write assembly code by yourself. The Go standard library sync/atomic package provides atomic operation related APIs. It provides the following types for atomic operations.
atomic.Bool{}
atomic.Pointer[]{}
atomic.Int32{}
atomic.Int64{}
atomic.Uint32{}
atomic.Uint64{}
atomic.Uintptr{}
atomic.Value{}
The Pointer atomic type supports generics, and the Value type can store any type. In addition, many functions are provided for easy operation. Because atomic operations are too fine-grained, in most cases, they are more suitable for handling these basic data types.
TIP
atmoic package provides atomic operations for basic data types. The implementation of atomic operations is written in plan9 assembly language.
Usage
Every atomic type provides the following three methods:
Load(): Atomically load the valueSwap(newVal type) (old type): Atomically swap the value and return the old valueStore(val type): Atomically store the value
Different types may also have other extra methods, such as the Add method for integer types to implement atomic addition operations. Below is an example using an int64 type:
func main() {
  var aint64 atomic.Uint64
  // Store the value
  aint64.Store(64)
  // Swap the value
  aint64.Swap(128)
  // Add
  aint64.Add(112)
    // Load the value
  fmt.Println(aint64.Load())
}
Or you can also use functions directly:
func main() {
   var aint64 int64
   // Store the value
   atomic.StoreInt64(&aint64, 64)
   // Swap the value
   atomic.SwapInt64(&aint64, 128)
   // Add
   atomic.AddInt64(&aint64, 112)
   // Load the value
   fmt.Println(atomic.LoadInt64(&aint64))
}
Other types of usage are also similar, and the final output is as follows:
240CAS
The atomic package also provides the CompareAndSwap operation, known as CAS. It is the core of implementing optimistic locking and lock-free data structures. Optimistic locking is not a real lock; it is a lock-free concurrency-control strategy under concurrent conditions: before modifying data, a thread/goroutine does not acquire a lock. Instead, it first reads the data, performs calculations, and then uses CAS when committing the modification to check whether any other thread has changed the data in the meantime. If not (the value is still equal to the previously read value), the modification succeeds; otherwise, it fails and retries. Hence it is called “optimistic” because it always assumes that shared data will not be modified and only acts when it finds the data unchanged. In contrast, the mutex we saw earlier is a pessimistic lock: a mutex always pessimistically assumes that shared data will definitely be modified, so it locks before the operation and unlocks afterward. Because lock-free concurrency avoids locks, its safety and efficiency are generally higher than locking approaches; many concurrent-safe data structures are implemented with CAS. However, real-world efficiency still depends on the specific usage scenario. Let’s look at an example:
var lock sync.Mutex

var count int

func Add(num int) {
   lock.Lock()
   count += num
   lock.Unlock()
}
This is an example using a mutex lock: before each increment, the lock is acquired, and after completion it is released, during which other goroutines are blocked. Next, let's refactor it using CAS:
var count int64

func Add(num int64) {
  for {
    expect := atomic.LoadInt64(&count)
    if atomic.CompareAndSwapInt64(&count, expect, expect+num) {
      break
    }
  }
}
For CAS, there are three parameters: the memory value, the expected value, and the new value. During execution, CAS compares the expected value with the current memory value; if they match, the subsequent operation is performed, otherwise nothing happens. In Go’s atomic package, CAS-related functions require passing the address, the expected value, and the new value, and they return a boolean indicating whether the swap succeeded. For example, the function signature for the int64 CAS operation is as follows:
func CompareAndSwapInt64(addr *int64, old, new int64) (swapped bool)In the CAS example, we first use LoadInt64 to obtain the expected value, then use CompareAndSwapInt64 to perform the compare-and-swap. If it fails, we loop repeatedly until it succeeds. Although this lock-free approach does not block goroutines, the continuous looping is still a significant CPU overhead. Therefore, in some implementations, the operation may be abandoned after a certain number of failures. However, for the simple addition shown above, the operation is not complex, so a lock-free implementation is entirely feasible.
TIP
In most cases, just comparing values is not sufficient for concurrent safety, such as the ABA problem caused by CAS. To address this, we can use an additional version to solve the problem.
Value
The atomic.Value struct can store arbitrary types of values. Its definition is as follows:
type Value struct {
   // any类型
   v any
}
Although it can store arbitrary types, it cannot store nil, and the types of the stored values must be consistent. The following two examples will not compile:
func main() {
   var val atomic.Value
   val.Store(nil)
   fmt.Println(val.Load())
}
// panic: sync/atomic: store of nil value into Valuefunc main() {
var val atomic.Value
val.Store("hello world")
val.Store(114514)
fmt.Println(val.Load())
}
// panic: sync/atomic: store of inconsistently typed value into ValueApart from that, its usage is not much different from other atomic types, and it should be noted that all atomic types should not be copied by value; instead, their pointers should be used.